GitHub Copilot 進階開發實戰
學員課前注意事項

課程簡介
從我開設《GitHub Copilot 協作開發實戰》課程以來,已經滿一年,在這段時間 GitHub Copilot 完全沒有慢下腳步,除了 LLM 基礎模型一直在進步之外,對於程式碼的分析與理解能力也到達了一個全新的高度。經過這段時間的改進,GitHub Copilot 真的變得好強大,有很多細節若沒有特別去研究,根本不可能快速掌握,因此我打算開設一個《GitHub Copilot 進階開發實戰》課程,幫助那些已經使用 GitHub Copilot 一段時間的朋友,好好的梳理一下目前為止 GitHub Copilot 到底有多強!👍
老話一句,我認為學習 GitHub Copilot 的最佳途徑,就是觀摩一個熟練的高手用 GitHub Copilot 寫 Code 給你看,帶你跳出思維的框框,不但可以深入瞭解 GitHub Copilot 的背後原理,更要透過情境理解 GitHub Copilot 的活用方式,用正確的方法來使用 GitHub Copilot 才能釋放 AI 的最大潛力!✊
課程特色
- 本課程不包含實作練習,但可以看到講師展示各種實用的 GitHub Copilot 應用技巧
- 課程全程錄影,學員可在課後
3個月內免費無限次回放,反覆學習不遺漏! - 由 Will 保哥 全程線上授課,無地域限制,可即時回應學員任何疑惑
- 提供專屬 Discord 頻道,課後持續交流與學習,打造長效社群
報名連結
- 2024.12.20 (五) 20:00 - 22:00 GitHub Copilot 進階開發實戰 (課程已結束)
- 2024.12.20 (五) 20:00 - 22:00 GitHub Copilot 進階開發實戰 (追加票) (課程已結束)
我們過往的課程都可以到 Accupass 的「線上課程訂購區」課程訂購,如果想要推薦同事或朋友也想學習,可以請他們到這裡購買。有任何問題歡迎來信洽詢,加入課程的學員都可以參加本課程專屬的 Discord 學習社群!
給學員的話
各位同學大家好:
最近半年 GitHub Copilot 推出了許多功能,我相信有許多人在工作與開發上十分忙碌,所以我特別設計了這堂課程,讓大家可以在短短兩小時內,快速掌握 GitHub Copilot 的進階開發技巧,讓你可以更有效率地使用 GitHub Copilot,提升開發效率,讓你的程式碼更加精準與高效!🚀
我將會使用 Visual Studio Code 的 Insiders 版本為主要展示環境,畢竟 GitHub Copilot 跟 Visual Studio Code 高度整合,許多實驗性與預覽功能,都會優先登陸 Visual Studio Code Insiders 版本,讓大家搶先體驗新功能!👍
上課過程中我也會根據不同的情境,提及 Visual Studio 2022 最新的 GitHub Copilot 功能,目前 Visual Studio 2022 在 GitHub Copilot 方面投注了不少心力,許多功能都會在短時間內跟上,建議隨時維持在最新版本。👌
這堂兩小時的課程不會有太多給大家練習的時間,但你依然可以先準備好上課所需的開發環境,隨時體驗 GitHub Copilot 帶來的強大功能,並且在課堂上隨時提出你的任何想法與疑問。
以下文件將說明學員上課前的注意事項,請詳細閱讀並提前準備,有任何疑問都歡迎隨時來信洽詢。
註冊 Discord 帳號
我們最近的課程都已經陸續將課程資訊集中到 Discord 伺服器管理,這是一個非常強大的社群工具,可以讓我們在課程之後也能夠持續交流,請大家先註冊一個 Discord 帳號,並且加入我們的多奇教育訓練 Discord 伺服器。

加入 Discord 伺服器之後,進入本次課程專屬頻道的步驟如下:
-
請至
規則頻道仔細閱讀多奇教育訓練 Discord 伺服器的使用規約。 -
閱讀完畢後,請移駕到
加入課程頻道,頻道中有加入課程專屬頻道的啟用說明。這個步驟主要是讓你輸入本課程的邀請碼,這組邀請碼我們會連同上課通知一併發出給學員,只要驗證正確即可看見本課程學員專屬的 Discord 頻道,請務必詳細閱讀 Discord
加入課程頻道的相關說明。
以下是加入 Discord 課程專屬頻道的影片示範:
注意:若加入頻道的驗證次數錯誤超過三次,您的 Discord 帳號將自動被系統鎖定,如有失誤請來信解鎖: training@miniasp.com
註冊 GitHub 帳號
如果你還沒有 GitHub 帳號 (應該不太可能吧?),請務必先註冊好一個 GitHub 帳號,並且在上課前先登入 GitHub 帳號。
註冊網址:https://github.com/signup

購買 GitHub Copilot 個人版訂閱方案
由於 GitHub Copilot 個人版 (Individual) 是個付費的訂閱服務,因此需要先購買 GitHub Copilot 訂閱方案,才能使用 GitHub Copilot 功能。
購買網址:https://github.com/features/copilot/

點擊 Get started with Copilot 之後,選擇 Copilot Individual 的 Start a free trial 按鈕,就可以開始購買。
然後選擇你要購買的方案,目前有兩種方案可供選擇:
- 月繳
$10美元 - 年繳
$100美元 (一年可以省下$20美元)
使用 GitHub Copilot 商業版請記得先啟用功能
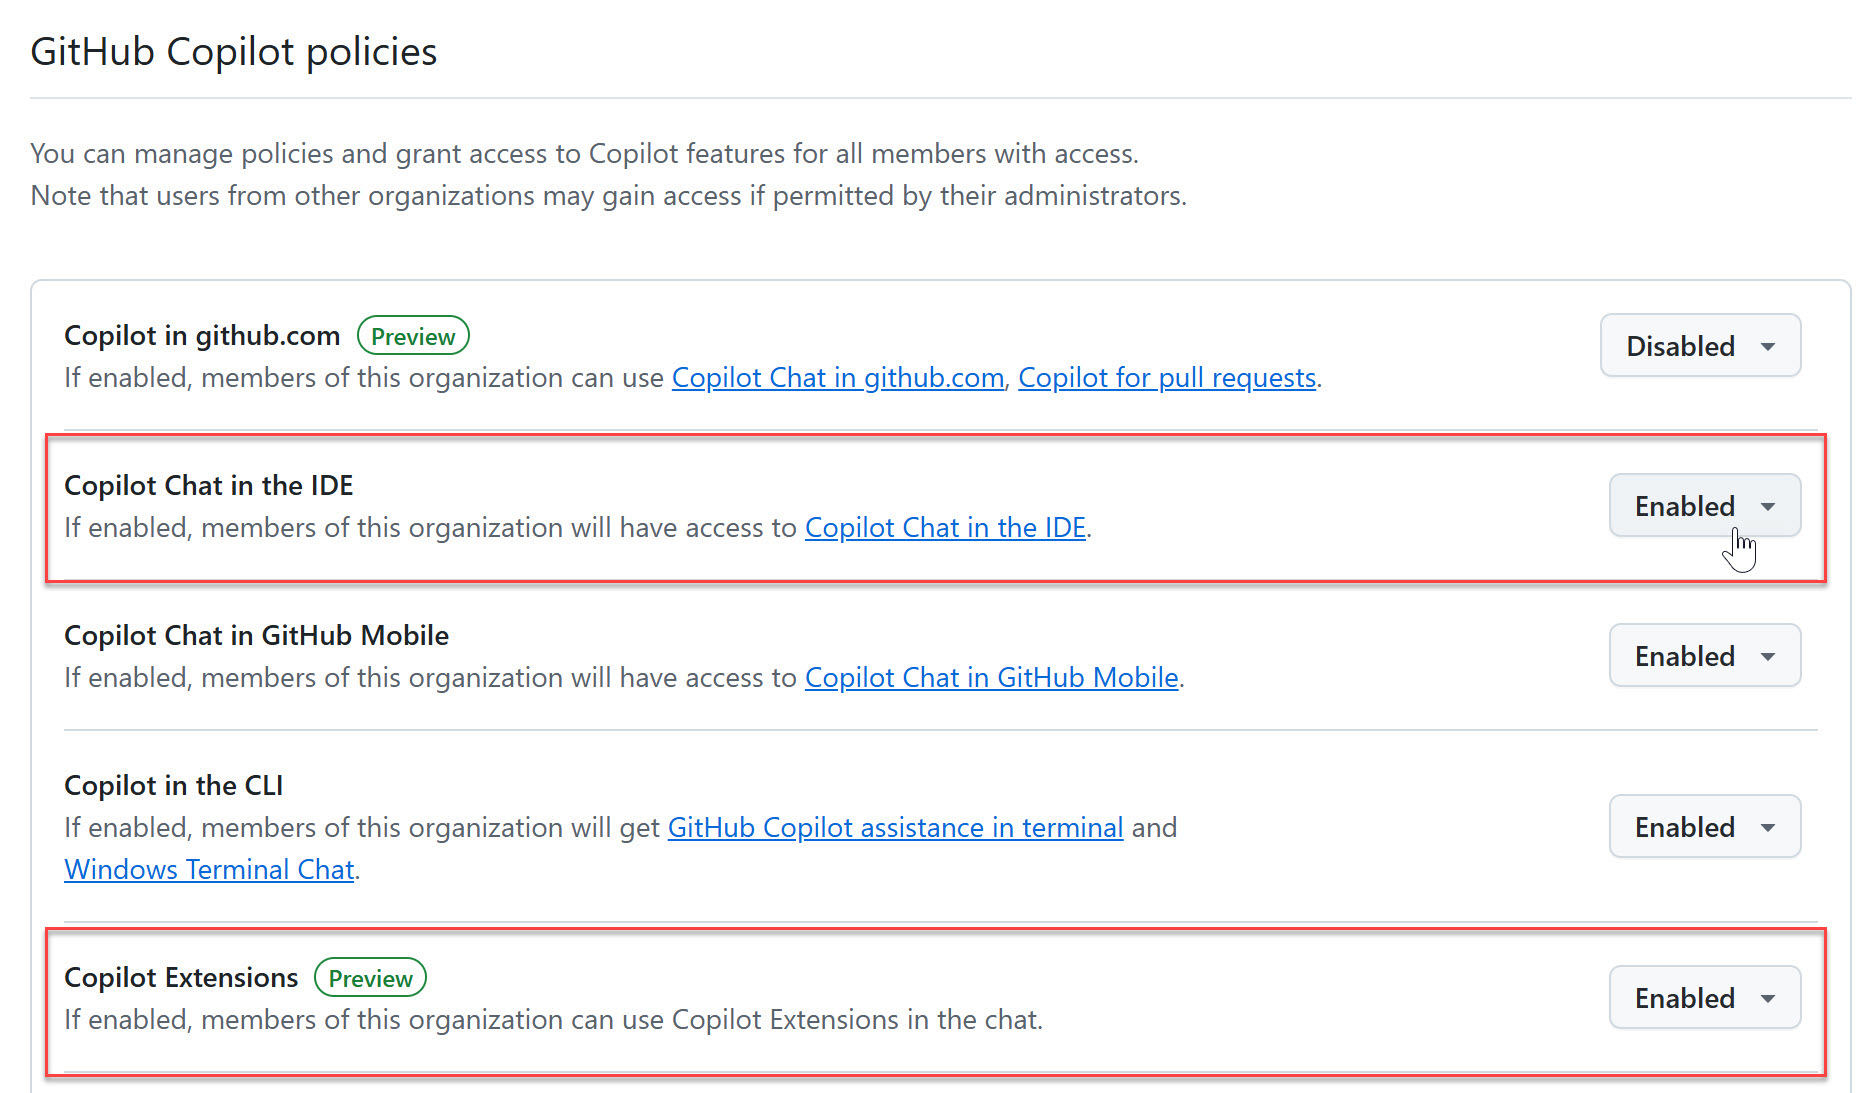
由於 GitHub Copilot 的商業版(Business)或企業版(Enterprise)都需要先在 GitHub 建立組織(Organization)才能使用,若你的 Copilot 授權是由公司統一管理的話,你還必須確認組織管理員是否有啟用 GitHub Copilot 相關功能,以下示意圖可以讓學員們提供公司管理者參考。
安裝 GitHub 支援的開發工具
目前 GitHub Copilot 支援以下四種開發工具,請安裝最新版本的開發工具外,有些也需安裝額外的擴充套件:
- Visual Studio Code
- Visual Studio 2022
- 若為
v17.12.0之後的版本,將擁有最完整的 GitHub Copilot 功能! - 若為
v17.10.0之後的版本已經內建 GitHub Copilot 功能,無須額外安裝擴充套件! - 若為
v17.8.0之後的版本需安裝 GitHub Copilot Completions 與 GitHub Copilot Chat 擴充套件,詳見 Get GitHub Copilot for Visual Studio 2022 versions 17.8 to 17.9。 - 若為
v17.7.0以前的版本,則無法使用 GitHub Copilot 功能。
- 若為
- JetBrains IDEs
- Neovim
- Xcode
- Azure Data Studio
目前為止 GitHub Copilot 支援度最高的開發工具是 Visual Studio Code,支援了 GitHub Copilot 的完整功能,比較能發揮全部戰力。除此之外,最新版本的 Visual Studio 2022 (v17.10.0+) 也內建了許多過往沒有的功能,本次課程中也會分享許多在 Visual Studio 2022 的開發技巧。
有些 GitHub Copilot 最新功能要安裝 Visual Studio Code Insiders 才能體驗,各位也可以考慮安裝這個版本。
在 Visual Studio Code 安裝完 GitHub Copilot 擴充套件後會出面導覽提示,點選「標記完成 (Mark Done)」關閉即可。

切換 Visual Studio Code 顯示語言為繁體中文
Visual Studio Code 是一套跨平台的編輯器,支援 Windows、macOS 與 Linux,因此理論上所有人都可以順利安裝與使用,如果你真的有遇到什麼困難,歡迎隨時到 Discord 課程專屬頻道中發問。
由於 Visual Studio Code 是一套輕量級的編輯器,它的功能是透過安裝「擴充套件」來增強的。
首先,Visual Studio Code 支援完整的「繁體中文」介面,而且翻譯品質非常好,在首次安裝並啟動 Visual Studio Code 後,該軟體就會提醒你安裝繁體中文套件,建議英文不太好的朋友可以安裝繁體中文版。

如果你的介面沒有自動切換到繁體中文版,那就請透過以下步驟手動切換:
-
按下
F1並輸入>display language並選擇Configure Display Language
-
選擇
中文(繁體) (zh-tw)並按下Enter鍵
-
按下
Restart按鈕以重新啟動 Visual Studio Code
安裝 Visual Studio Code 擴充套件
GitHub Copilot 的功能是透過安裝擴充套件來實現的,你需要安裝以下擴充套件才能順利的使用 GitHub Copilot 工具:


以下是額外的擴充功能,有需要再安裝即可:
- GitHub Pull Requests (GitHub Repo)
- Web Search for Copilot (GitHub Repo)
- Vision for Copilot Preview (GitHub Repo)
- GitHub Copilot for Azure (GitHub Repo)
- vscode-mermAId (GitHub Repo)
- VS Code Commander (GitHub Repo)
- PG Chat Participant (GitHub Repo)
GitHub Copilot 在 Visual Studio Code 的建議設定
以下是我在精雕細琢之後,覺得最完美的 GitHub Copilot 與 VS Code Speech 設定參數,可以讓你在使用 GitHub Copilot 時更加順暢,也可以讓你在使用語音輸入時更加自然舒適。
請先找到 Visual Studio Code 的左下角或右下角的 ⚙ 圖示,點開之後選擇 設定 與 鍵盤快速鍵 這兩項,依據以下說明調整設定。

你也可以打開 設定 與 鍵盤快速鍵 後,找到右上角的 開啟設定(JSON) 按鈕,你就可以開啟相對應的 settings.json 或 keybindings.json 檔案,直接合併我在下方整理的 JSON 設定也可以,這是最快速的設定方法。

-
使用者設定
-
GitHub Copilot - 一般設定
-
github.copilot.enable設定在所有檔案啟用 GitHub Copilot 功能,但停用「純文字」檔案類型。
-
github.copilot.editor.enableAutoCompletions設定為true啟用程式碼自動補全功能,也就是 Inline 自動完成功能。
因為自動完成功能經常會提供錯誤的提示,有些人會選擇關閉這個選項。
-
github.copilot.editor.enableCodeActions設定為true控制 Copilot 命令在可用時是否顯示為 Code Actions (程式碼動作)
-
github.copilot.renameSuggestions.triggerAutomatically設定為true自動觸發重新命名建議
-
window.commandCenter設定為true如果要啟用
chat.commandCenter.enabled設定,就必須啟用這個設定。 -
chat.commandCenter.enabled設定為true設定要不要在編輯器中啟用 Copilot Chat 指令中心按鈕。
-
workbench.commandPalette.experimental.askChatLocation設定為chatView當你按下
F1之後詢問Ask GitHub Copilot的結果要顯示在哪裡,選chatView就會留下提問記錄,若選quickChat就不會留下。 -
github.copilot.chat.search.semanticTextResults設定為true在搜尋檢視中啟用語意搜尋結果。
-
-
GitHub Copilot Chat
-
github.copilot.chat.followUps設定為firstOnly或always是否要在聊天中建議跟進訊息,提供你下一個提示的建議。
-
github.copilot.chat.localeOverride設定為zh-TW設定 GitHub Copilot Chat 的回應語言預設為繁體中文
-
github.copilot.chat.useProjectTemplates設定為true使用
/new時直接選用 GitHub 專案範本 -
github.copilot.chat.scopeSelection設定為true如果使用者使用
/explain並且使用中編輯器沒有選取,是否提示使用者選取特定符號範圍。 -
chat.detectParticipant.enabled設定為true在 Chat View 聊天的時候自動偵測聊天參與者,因此你可以不用特別透過
@叫用聊天參與者。如果結果不如預期,可以按下rerun without重跑一次,就會交給 Copilot 來回答。(說明)
-
-
GitHub Copilot Chat - 內嵌聊天 (Inline Chat)
-
github.copilot.chat.temporalContext.enabled設定為true是否要在 Copilot 要求中包含最近檢視及編輯過的檔案。
-
inlineChat.holdToSpeech設定為true按住不放
Ctrl+U或Ctrl+I開始語音對話 -
inlineChat.finishOnType設定為false在編輯器中輸入時,不會自動結束 Inline Chat 對話
-
inlineChat.mode設定為preview預設為
live,可以選擇preview(先給預覽) 或live(直接寫入) 兩種模式
-
-
GitHub Copilot Chat - 偵錯相關設定
-
github.copilot.chat.startDebugging.enabled設定為true在 Chat View 啟用實驗性的
/startDebugging命令,幫你快速在 VS Code 初始化偵錯相關設定。
-
-
GitHub Copilot Chat - 測試相關設定
-
github.copilot.chat.setupTests.enabled設定為true啟用實驗性的
/setupTests命令,幫你在 VS Code 快速初始化單元測試相關設定。 -
github.copilot.chat.fixTestFailure.enabled設定為true啟用聊天中的
/fixTestFailure命令,並在未發現測試設定時自動委派某些/fix呼叫。 -
github.copilot.chat.generateTests.codeLens設定為true顯示產生測試程式碼 Code Lens 提示,針對目前測試覆蓋範圍資訊未涵蓋的符號。
-
github.copilot.chat.testGeneration.instructions設定為以下內容:"github.copilot.chat.testGeneration.instructions": [ { "file": ".copilot-test-instructions.md" }, { "text": "Always try uniting related tests in a suite." } ],
-
-
GitHub Copilot Chat - 自訂提示
-
github.copilot.chat.codeGeneration.useInstructionFiles設定為true使用
.github/copilot-instructions.md文件來自訂程式碼生成邏輯 -
github.copilot.chat.codeGeneration.instructions設定為以下內容:"github.copilot.chat.codeGeneration.instructions": [ { "text": "Always response in #zh-tw." }, { "text": "When outputing any text, use the following translation mappings: create = 建立, object = 物件, queue = 佇列, stack = 堆疊, information = 資訊, invocation = 呼叫, code = 程式碼, running = 執行, library = 函式庫, schematics = 原理圖, building = 建構, Setting up = 設定, package = 套件, video = 影片, for loop = for 迴圈, class = 類別, Concurrency = 平行處理, Transaction = 交易, Transactional = 交易式, Code Snippet = 程式碼片段, Code Generation = 程式碼產生器, Any Class = 任意類別, Scalability = 延展性, Dependency Package = 相依套件, Dependency Injection = 相依性注入, Reserved Keywords = 保留字, Metadata = Metadata, Clone = 複製, Memory = 記憶體, Built-in = 內建, Global = 全域, Compatibility = 相容性, Function = 函式, Refresh = 重新整理, document = 文件, example = 範例, demo = 展示, quality = 品質, tutorial = 指南, recipes = 秘訣, byte = 位元組, bit = 位元" }, { "file": ".copilot-instructions.md" } ], -
github.copilot.chat.reviewSelection.instructions設定為以下內容:"github.copilot.chat.reviewSelection.instructions": [ { "file": ".copilot-review-instructions.md" } ], -
github.copilot.chat.commitMessageGeneration.instructions設定為以下內容:"github.copilot.chat.commitMessageGeneration.instructions": [ { "file": ".copilot-commit-message-instructions.md" } ],
-
-
GitHub Copilot Edit
-
github.copilot.chat.edits.suggestRelatedFilesForTests設定為true該功能會在你編輯程式碼時,建議與測試相關的檔案。這對於開發者來說非常有用,因為它可以幫助你快速找到並編輯與當前程式碼變更相關的測試檔案,從而確保程式碼的品質和可靠性。
-
github.copilot.chat.edits.suggestRelatedFilesFromGitHistory設定為true該功能會根據 Git 歷史紀錄來建議相關的檔案。這意味著當你編輯某個檔案時,GitHub Copilot Chat 會根據過去的 Git 提交紀錄,建議可能與當前編輯相關的其他檔案。這有助於你更全面地理解程式碼變更的影響範圍,並確保所有相關檔案都得到了適當的更新。
-
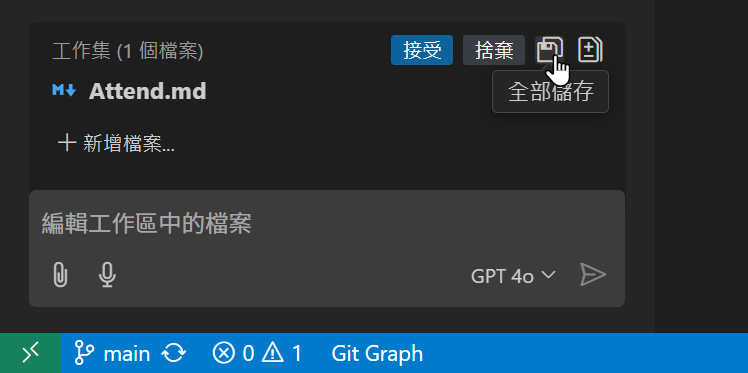
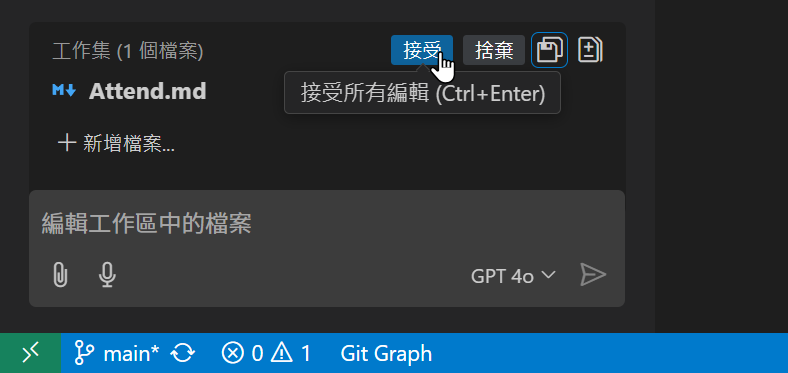
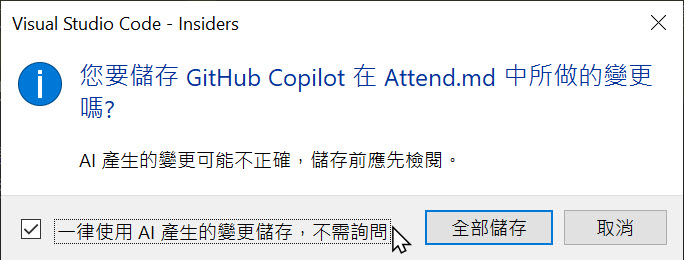
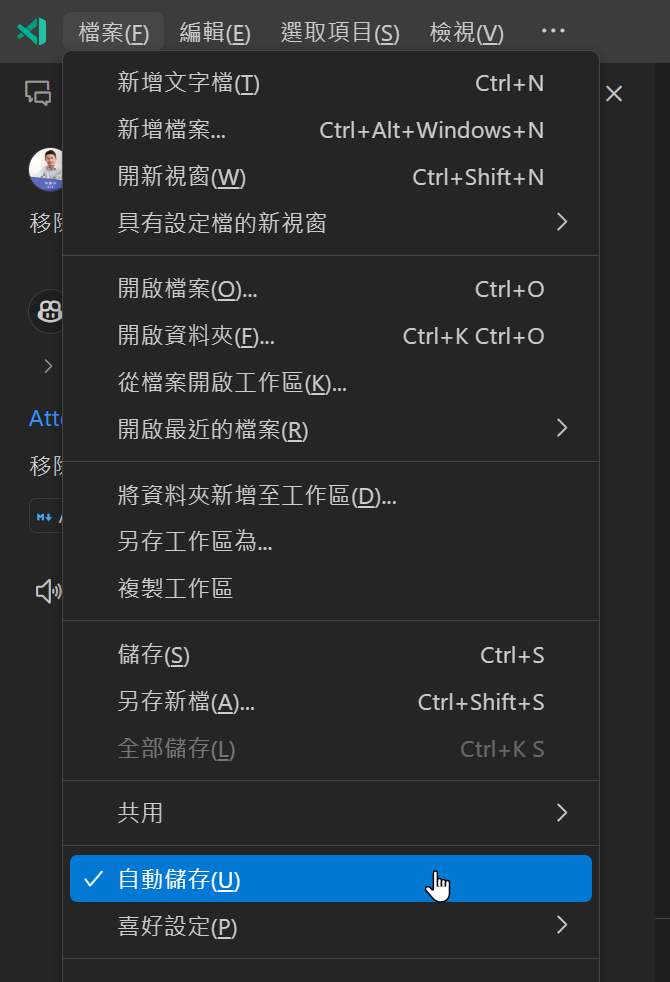
chat.editing.alwaysSaveWithGeneratedChanges設定為false如果你有用 Copilot Edits 產生程式碼,當你按下「接受」的時候,並不會自動存檔,然而有個 全部儲存(Save All) 的按鈕 (圖一),按下的時候會儲存包含 AI 產生的變更的檔案,但儲存前會先會顯示確認對話框 (圖二),可以幫助你全部儲存。你可以在儲存後,按下「接受」來完成這次編輯 (圖三)。也可以按下「捨棄」復原變更 (圖四),即便你已經按下了儲存,還是可以透過捨棄按鈕還原到編輯前的狀態。
以上的行為是預設的,由於很多專案可能會依賴由檔案變更觸發的自動化任務,例如自動建置或測試任務等等,像是
dotnet watch或ng serve --watch或webpack或parcel watch都有類似機制。如果自動儲存的話,就可能會不斷觸發這些工具自動觸發。在圖二的對話框中,如果你勾選了「一律使用 AI 產生的變更儲存,不需詢問」選項 (圖五),以後就可以在不詢問確認的情況下永遠儲存檔案。勾選後,原本的「全部儲存」按鈕將會被隱藏。事實上,這個動作會幫你調整
chat.editing.alwaysSaveWithGeneratedChanges設定為true。當
chat.editing.alwaysSaveWithGeneratedChanges設定為true之後,你下次用 Copilot Edits 編輯檔案,在還沒按下「接受」之前,不會「自動儲存」,即便你在按下「接受」之後,依然不會「自動儲存」。除非你啟用了 VS Code 的
[檔案]>[自動儲存]功能 ("files.autoSave": "afterDelay") (圖六),才會真的「自動儲存」喔! -
chat.editing.confirmEditRequestRemoval設定為true該功能會在你嘗試刪除由 GitHub Copilot Chat 生成的程式碼變更時,提示你確認是否要刪除。這樣可以避免意外刪除程式碼變更,並確保你的程式碼變更是正確的。
-
chat.editing.confirmEditRequestRetry設定為true該功能會在你嘗試重新生成由 GitHub Copilot Chat 生成的程式碼變更時,提示你確認是否要重新生成。這樣可以避免意外重新生成程式碼變更,並確保你的程式碼變更是正確的。
-
-
Accessibility (Voice)
-
accessibility.voice.speechLanguage設定為zh-TW設定語音輸入的語言為繁體中文。
-
accessibility.voice.autoSynthesize設定為off在 Copilot 回應時自動合成語音,但有時候太吵了,建議關閉!XD
-
accessibility.voice.keywordActivation設定為chatInContext代表你在說
Hey Code時會在 Copilot 聊天視窗互動 -
accessibility.voice.speechTimeout設定為1200設定語音輸入後可停頓的時間為 1200 毫秒
-
accessibility.voice.ignoreCodeBlocks設定為true(Insiders)避免在合成語音的時候去讀程式碼區塊的內容
-
以下是
settings.json設定檔內容:{ // GitHub Copilot "github.copilot.enable": { "*": true, "plaintext": false, "markdown": true, "scminput": true, "yaml": true, "html": true, "powershell": true, "javascript": true, "aspnetcorerazor": true }, "github.copilot.editor.enableAutoCompletions": true, "github.copilot.editor.enableCodeActions": true, "github.copilot.renameSuggestions.triggerAutomatically": true, "window.commandCenter": true, "chat.commandCenter.enabled": true, "workbench.commandPalette.experimental.askChatLocation": "chatView", "github.copilot.chat.search.semanticTextResults": true, // GitHub Copilot Chat "github.copilot.chat.followUps": "always", "github.copilot.chat.localeOverride": "zh-TW", "github.copilot.chat.useProjectTemplates": true, "github.copilot.chat.scopeSelection": true, "chat.detectParticipant.enabled": true, // GitHub Copilot Chat - 內嵌聊天 (Inline Chat) "github.copilot.chat.temporalContext.enabled": true, "inlineChat.holdToSpeech": true, "inlineChat.finishOnType": false, "inlineChat.mode": "preview", // GitHub Copilot Chat - 偵錯相關設定 "github.copilot.chat.startDebugging.enabled": true, // GitHub Copilot Chat - 測試相關設定 "github.copilot.chat.setupTests.enabled": true, "github.copilot.chat.fixTestFailure.enabled": true, "github.copilot.chat.generateTests.codeLens": true, "github.copilot.chat.testGeneration.instructions": [ { "file": ".copilot-test-instructions.md" }, { "text": "Always try uniting related tests in a suite." } ], // GitHub Copilot Chat - 自訂提示 "github.copilot.chat.codeGeneration.useInstructionFiles": true, "github.copilot.chat.codeGeneration.instructions": [ { "text": "When outputing any text, use the following translation mappings: create = 建立, object = 物件, queue = 佇列, stack = 堆疊, information = 資訊, invocation = 呼叫, code = 程式碼, running = 執行, library = 函式庫, schematics = 原理圖, building = 建構, Setting up = 設定, package = 套件, video = 影片, for loop = for 迴圈, class = 類別, Concurrency = 平行處理, Transaction = 交易, Transactional = 交易式, Code Snippet = 程式碼片段, Code Generation = 程式碼產生器, Any Class = 任意類別, Scalability = 延展性, Dependency Package = 相依套件, Dependency Injection = 相依性注入, Reserved Keywords = 保留字, Metadata = Metadata, Clone = 複製, Memory = 記憶體, Built-in = 內建, Global = 全域, Compatibility = 相容性, Function = 函式, Refresh = 重新整理, document = 文件, example = 範例, demo = 展示, quality = 品質, tutorial = 指南, recipes = 秘訣, byte = 位元組, bit = 位元" }, { "text": "Always response in #zh-tw." }, { "file": ".copilot-instructions.md" } ], "github.copilot.chat.reviewSelection.instructions": [ { "text": "Always response in #zh-tw." }, { "file": ".copilot-review-instructions.md" } ], // GitHub Copilot Chat - 自訂 Git Commit 訊息提示 "github.copilot.chat.commitMessageGeneration.instructions": [ { "text": "# Conventional Commits 1.0.0\r\n\r\n## Summary\r\n\r\nThe Conventional Commits specification is a lightweight convention on top of commit messages. It provides an easy set of rules for creating an explicit commit history; which makes it easier to write automated tools on top of. This convention dovetails with [SemVer](http://semver.org/), by describing the features, fixes, and breaking changes made in commit messages.\r\n\r\nThe commit message should be structured as follows:\r\n\r\n* * * * *\r\n\r\n```\r\n<type>[optional scope]: <description>\r\n\r\n[optional body]\r\n\r\n[optional footer(s)]\r\n```\r\n\r\n* * * * *\r\n\r\nThe commit contains the following structural elements, to communicate intent to the consumers of your library:\r\n\r\n1. **fix:** a commit of the *type* `fix` patches a bug in your codebase (this correlates with [`PATCH`](http://semver.org/#summary) in Semantic Versioning).\r\n2. **feat:** a commit of the *type* `feat` introduces a new feature to the codebase (this correlates with [`MINOR`](http://semver.org/#summary) in Semantic Versioning).\r\n3. **BREAKING CHANGE:** a commit that has a footer `BREAKING CHANGE:`, or appends a `!` after the type/scope, introduces a breaking API change (correlating with [`MAJOR`](http://semver.org/#summary) in Semantic Versioning). A BREAKING CHANGE can be part of commits of any *type*.\r\n4. *types* other than `fix:` and `feat:` are allowed, for example [@commitlint/config-conventional](https://github.com/conventional-changelog/commitlint/tree/master/%40commitlint/config-conventional) (based on the [Angular convention](https://github.com/angular/angular/blob/22b96b9/CONTRIBUTING.md#-commit-message-guidelines)) recommends `build:`, `chore:`, `ci:`, `docs:`, `style:`, `refactor:`, `perf:`, `test:`, and others.\r\n5. *footers* other than `BREAKING CHANGE: <description>` may be provided and follow a convention similar to [git trailer format](https://git-scm.com/docs/git-interpret-trailers).\r\n\r\nAdditional types are not mandated by the Conventional Commits specification, and have no implicit effect in Semantic Versioning (unless they include a BREAKING CHANGE). A scope may be provided to a commit's type, to provide additional contextual information and is contained within parenthesis, e.g., `feat(parser): add ability to parse arrays`.\r\n\r\n## Examples\r\n\r\n### Commit message with description and breaking change footer\r\n\r\n```\r\nfeat: allow provided config object to extend other configs\r\n\r\nBREAKING CHANGE: `extends` key in config file is now used for extending other config files\r\n```\r\n\r\n### Commit message with `!` to draw attention to breaking change\r\n\r\n```\r\nfeat!: send an email to the customer when a product is shipped\r\n```\r\n\r\n### Commit message with scope and `!` to draw attention to breaking change\r\n\r\n```\r\nfeat(api)!: send an email to the customer when a product is shipped\r\n```\r\n\r\n### Commit message with both `!` and BREAKING CHANGE footer\r\n\r\n```\r\nchore!: drop support for Node 6\r\n\r\nBREAKING CHANGE: use JavaScript features not available in Node 6.\r\n```\r\n\r\n### Commit message with no body\r\n\r\n```\r\ndocs: correct spelling of CHANGELOG\r\n```\r\n\r\n### Commit message with scope\r\n\r\n```\r\nfeat(lang): add Polish language\r\n```\r\n\r\n### Commit message with multi-paragraph body and multiple footers\r\n\r\n```\r\nfix: prevent racing of requests\r\n\r\nIntroduce a request id and a reference to latest request. Dismiss\r\nincoming responses other than from latest request.\r\n\r\nRemove timeouts which were used to mitigate the racing issue but are\r\nobsolete now.\r\n\r\nReviewed-by: Z\r\nRefs: #123\r\n```\r\n\r\n## Specification\r\n\r\nThe key words \"MUST\", \"MUST NOT\", \"REQUIRED\", \"SHALL\", \"SHALL NOT\", \"SHOULD\", \"SHOULD NOT\", \"RECOMMENDED\", \"MAY\", and \"OPTIONAL\" in this document are to be interpreted as described in [RFC 2119](https://www.ietf.org/rfc/rfc2119.txt).\r\n\r\n1. Commits MUST be prefixed with a type, which consists of a noun, `feat`, `fix`, etc., followed by the OPTIONAL scope, OPTIONAL `!`, and REQUIRED terminal colon and space.\r\n2. The type `feat` MUST be used when a commit adds a new feature to your application or library.\r\n3. The type `fix` MUST be used when a commit represents a bug fix for your application.\r\n4. A scope MAY be provided after a type. A scope MUST consist of a noun describing a section of the codebase surrounded by parenthesis, e.g., `fix(parser):`\r\n5. A description MUST immediately follow the colon and space after the type/scope prefix. The description is a short summary of the code changes, e.g., *fix: array parsing issue when multiple spaces were contained in string*.\r\n6. A longer commit body MAY be provided after the short description, providing additional contextual information about the code changes. The body MUST begin one blank line after the description.\r\n7. A commit body is free-form and MAY consist of any number of newline separated paragraphs.\r\n8. One or more footers MAY be provided one blank line after the body. Each footer MUST consist of a word token, followed by either a `:<space>` or `<space>#` separator, followed by a string value (this is inspired by the [git trailer convention](https://git-scm.com/docs/git-interpret-trailers)).\r\n9. A footer's token MUST use `-` in place of whitespace characters, e.g., `Acked-by` (this helps differentiate the footer section from a multi-paragraph body). An exception is made for `BREAKING CHANGE`, which MAY also be used as a token.\r\n10. A footer's value MAY contain spaces and newlines, and parsing MUST terminate when the next valid footer token/separator pair is observed.\r\n11. Breaking changes MUST be indicated in the type/scope prefix of a commit, or as an entry in the footer.\r\n12. If included as a footer, a breaking change MUST consist of the uppercase text BREAKING CHANGE, followed by a colon, space, and description, e.g., *BREAKING CHANGE: environment variables now take precedence over config files*.\r\n13. If included in the type/scope prefix, breaking changes MUST be indicated by a `!` immediately before the `:`. If `!` is used, `BREAKING CHANGE:` MAY be omitted from the footer section, and the commit description SHALL be used to describe the breaking change.\r\n14. Types other than `feat` and `fix` MAY be used in your commit messages, e.g., *docs: update ref docs.*\r\n15. The units of information that make up Conventional Commits MUST NOT be treated as case sensitive by implementors, with the exception of BREAKING CHANGE which MUST be uppercase.\r\n16. BREAKING-CHANGE MUST be synonymous with BREAKING CHANGE, when used as a token in a footer.\r\n\r\n## Why Use Conventional Commits\r\n\r\n- Automatically generating CHANGELOGs.\r\n- Automatically determining a semantic version bump (based on the types of commits landed).\r\n- Communicating the nature of changes to teammates, the public, and other stakeholders.\r\n- Triggering build and publish processes.\r\n- Making it easier for people to contribute to your projects, by allowing them to explore a more structured commit history.\r\n\r\n## FAQ\r\n\r\n### How should I deal with commit messages in the initial development phase?\r\n\r\nWe recommend that you proceed as if you've already released the product. Typically *somebody*, even if it's your fellow software developers, is using your software. They'll want to know what's fixed, what breaks etc.\r\n\r\n### Are the types in the commit title uppercase or lowercase?\r\n\r\nAny casing may be used, but it's best to be consistent.\r\n\r\n### What do I do if the commit conforms to more than one of the commit types?\r\n\r\nGo back and make multiple commits whenever possible. Part of the benefit of Conventional Commits is its ability to drive us to make more organized commits and PRs.\r\n\r\n### Doesn't this discourage rapid development and fast iteration?\r\n\r\nIt discourages moving fast in a disorganized way. It helps you be able to move fast long term across multiple projects with varied contributors.\r\n\r\n### Might Conventional Commits lead developers to limit the type of commits they make because they'll be thinking in the types provided?\r\n\r\nConventional Commits encourages us to make more of certain types of commits such as fixes. Other than that, the flexibility of Conventional Commits allows your team to come up with their own types and change those types over time.\r\n\r\n### How does this relate to SemVer?\r\n\r\n`fix` type commits should be translated to `PATCH` releases. `feat` type commits should be translated to `MINOR` releases. Commits with `BREAKING CHANGE` in the commits, regardless of type, should be translated to `MAJOR` releases.\r\n\r\n### How should I version my extensions to the Conventional Commits Specification, e.g. `@jameswomack/conventional-commit-spec`?\r\n\r\nWe recommend using SemVer to release your own extensions to this specification (and encourage you to make these extensions!)\r\n\r\n### What do I do if I accidentally use the wrong commit type?\r\n\r\n#### When you used a type that's of the spec but not the correct type, e.g. `fix` instead of `feat`\r\n\r\nPrior to merging or releasing the mistake, we recommend using `git rebase -i` to edit the commit history. After release, the cleanup will be different according to what tools and processes you use.\r\n\r\n#### When you used a type *not* of the spec, e.g. `feet` instead of `feat`\r\n\r\nIn a worst case scenario, it's not the end of the world if a commit lands that does not meet the Conventional Commits specification. It simply means that commit will be missed by tools that are based on the spec.\r\n\r\n### Do all my contributors need to use the Conventional Commits specification?\r\n\r\nNo! If you use a squash based workflow on Git lead maintainers can clean up the commit messages as they're merged---adding no workload to casual committers. A common workflow for this is to have your git system automatically squash commits from a pull request and present a form for the lead maintainer to enter the proper git commit message for the merge.\r\n\r\n### How does Conventional Commits handle revert commits?\r\n\r\nReverting code can be complicated: are you reverting multiple commits? if you revert a feature, should the next release instead be a patch?\r\n\r\nConventional Commits does not make an explicit effort to define revert behavior. Instead we leave it to tooling authors to use the flexibility of *types* and *footers* to develop their logic for handling reverts.\r\n\r\nOne recommendation is to use the `revert` type, and a footer that references the commit SHAs that are being reverted:\r\n\r\n```\r\nrevert: let us never again speak of the noodle incident\r\n\r\nRefs: 676104e, a215868\r\n```" }, { "text": "請一律使用正體中文來撰寫記錄" }, { "file": ".copilot-commit-message-instructions.md" } ], // GitHub Copilot Chat Edit "github.copilot.chat.edits.suggestRelatedFilesForTests": true, "github.copilot.chat.edits.suggestRelatedFilesFromGitHistory": true, // Accessibility "accessibility.voice.speechLanguage": "zh-TW", "accessibility.voice.autoSynthesize": "off", "accessibility.voice.keywordActivation": "chatInContext", "accessibility.voice.speechTimeout": 1200, "accessibility.voice.ignoreCodeBlocks": true, } -
-
鍵盤設定
-
語音對話 (Chat View)
-
按下
Ctrl+U開始語音對話 -
按下
Ctrl+U結束語音對話 -
長按
Ctrl+U可直接說話,放開快速鍵就可以送出提示
-
-
語音指令 (Dictation)
-
按下
Alt+L開始語音輸入 -
按下
Alt+L或Escape結束語音輸入
-
以下是
keybindings.json設定檔內容:[ { "key": "ctrl+u", "command": "workbench.action.chat.startVoiceChat", "when": "!voiceChatInProgress" }, { "key": "ctrl+u", "command": "workbench.action.chat.stopListeningAndSubmit", "when": "voiceChatInProgress" }, { "key": "alt+l", "command": "workbench.action.editorDictation.start", "when": "!editorDictation.inProgress" }, { "key": "alt+l", "command": "workbench.action.editorDictation.stop", "when": "editorDictation.inProgress" } ] -
GitHub Copilot 相關連結
- GitHub Copilot 官網
- GitHub Copilot Plans
- GitHub Copilot 快速上手
- GitHub Copilot Extensions
- GitHub Copilot documentation
- GitHub Copilot in Visual Studio Code
上課前注意事項
由於我們上課時會採用 Zoom Workplace 桌面應用程式 軟體進行授課,因此請學員在上課前先安裝好 Zoom Workplace 桌面應用程式 軟體的最新版,並且測試好麥克風與喇叭是否可以正常運作,以免上課時無法順利聽到課程內容。
以下幾點請在上課前確認完畢:
-
檢查 Zoom 是否為最新版本
我這邊目前最新的 Zoom 版本為
6.3.0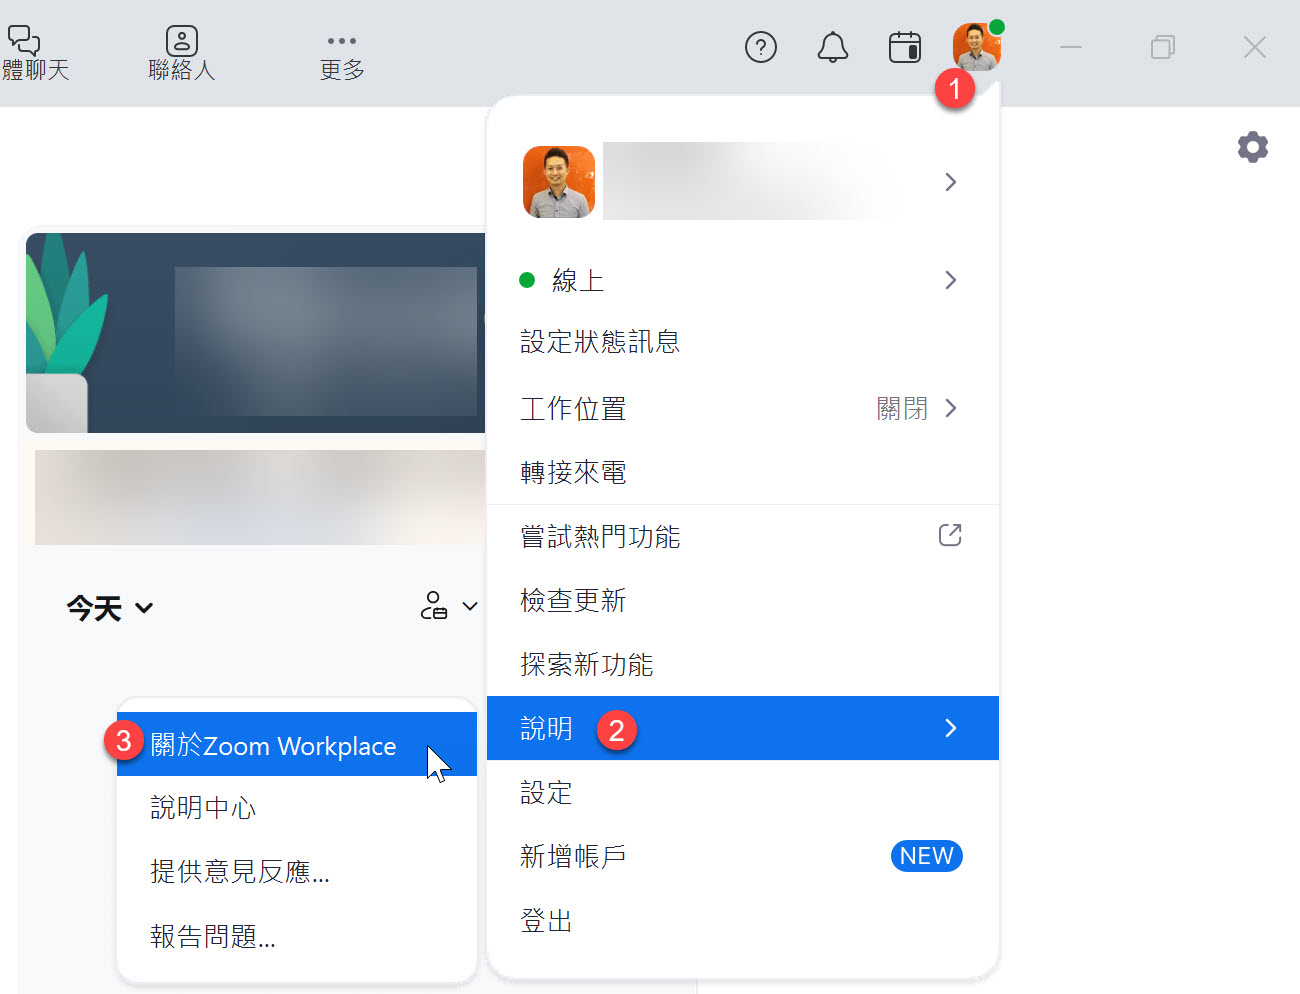
-
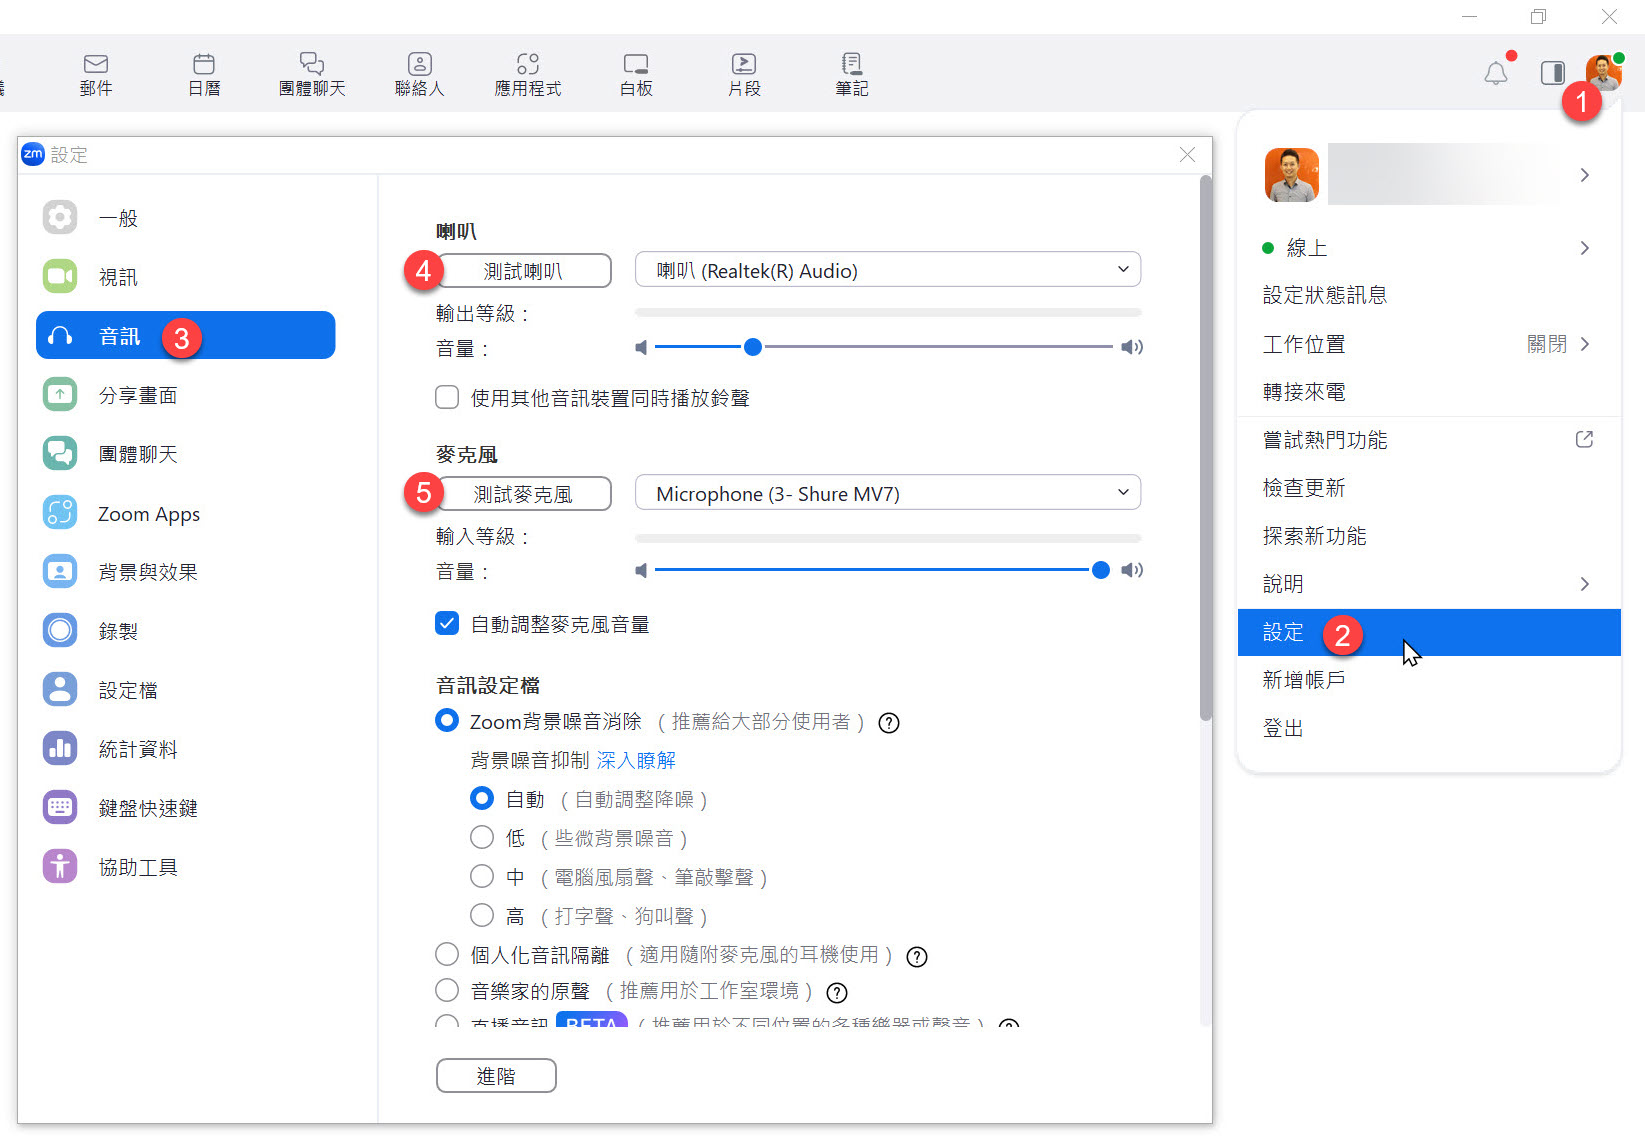
檢查 Zoom 麥克風與喇叭是否正常運作
你可以透過 Zoom 的測試功能來檢查麥克風與喇叭是否正常運作,如果你的麥克風與喇叭都正常運作,你會看到以下畫面:
上課時的注意事項
🔥 請不要在最後一刻才進入教室 🔥
🔥 請不要在最後一刻才進入教室 🔥
🔥 請不要在最後一刻才進入教室 🔥
-
你可以在課程開始前 30 分鐘進入 Zoom 會議室
我會在讓大家進入會議室時播放背景音樂,請確認可以聽的到聲音。
若聽不到聲音,可以先檢查 Zoom 麥克風與喇叭的設定是否正確,或是重新退出 Zoom 會議室後再次進入。
建議大家盡量不要使用「手機」進入 Zoom 會議室,因為手機的螢幕太小,上課體驗會比較差。但如果真的沒辦法,用手機也是可以上課,等日後看重播時用電腦看就好。
-
以下是進入會議室的步驟
開啟
Zoom軟體,點擊「加入會議」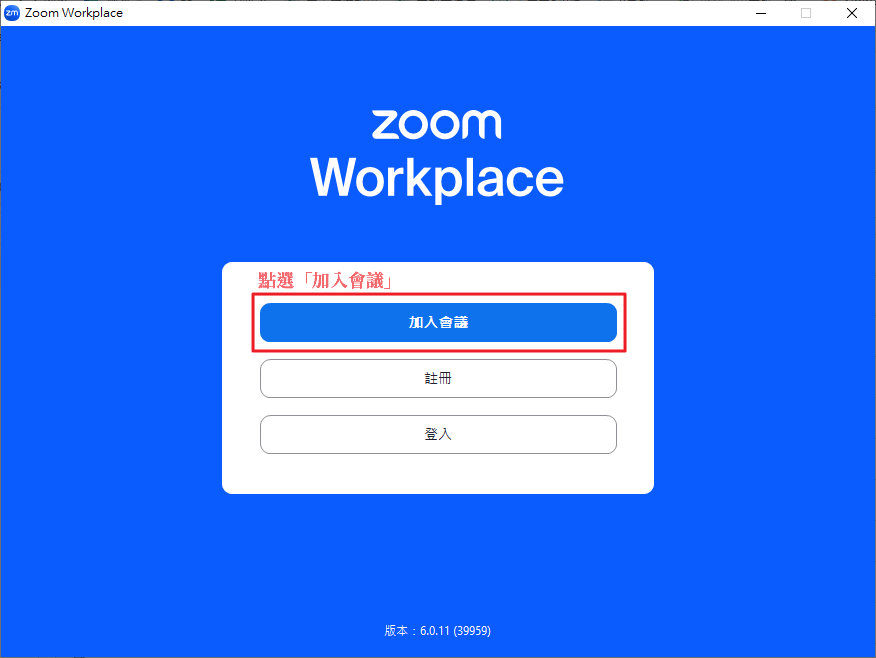
輸入我們課前通知的「會議號碼」與「顯示名稱」
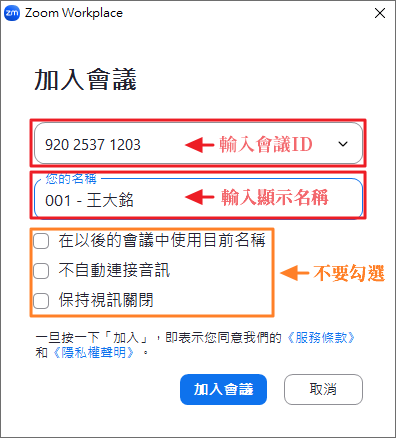
輸入會議密碼

測試喇叭和麥克風

請務必測試一下麥克風與喇叭是否正常運作,以免上課時無法順利聽到課程內容。

進入會議室之後,如果聽的到聲音,就按下「回應」的 ✅ 按鈕。
-
多利用「回應」功能給予課程回饋
過往有許多同學都找不到 Zoom 的「回應」功能,我特別截圖跟大家說明怎樣操作。

基本上在 Zoom 最下方的工具列上,會有個「回應」的按鈕,按下去之後會有三排的表情符號可以按:
第一排:這些表情符號按下之後可以表達你在課堂上的心情,而且 10 秒之後就會自動消失。這些表情非常重要,因為這可以讓講師知道你當下的心情,感覺開心的時候可以選 😂 (大笑),聽到很厲害的內容時可以按下 👍 (讚)、❤ (愛心)、👏 (拍手)、🎉 (獻花) 等表情,這可以讓課程變的相當活絡有趣!
第二排:這些符號按下去之後不會自動消失,主要用來回應講師的提問,方便大家回答問題。例如講師問「大家都聽的到我的聲音嗎?」,你可以按下 ✅ (打勾) 來代表「聽的到」,或是按下 ❌ (打叉) 來代表「聽不到」,這樣講師就可以得知你的狀態。
第三排:只有一顆「舉手」的按鈕,按下去代表你想要開麥克風發言,講師會看到你的舉手,然後依序讓你發言。先按「舉手」的人會排在最上面,講師會更容易看到你的舉手狀態。
以下有幾個好用的鍵盤快速鍵給大家參考,上課時可以盡情使用,增加上課的趣味性:
功能 Windows macOS 快速開啟「回應」選單 Ctrl+Shift+YCommand(⌘)+Shift+Y傳送會議回應 [鼓掌] Alt+Shift+4Option+Command(⌘)+4傳送會議回應 [讚] Alt+Shift+5Option+Command(⌘)+5傳送會議回應 [愛心] Alt+Shift+6Option+Command(⌘)+6傳送會議回應 [大笑] Alt+Shift+7Option+Command(⌘)+7傳送會議回應 [驚訝] Alt+Shift+8Option+Command(⌘)+8傳送會議回應 [慶祝/拉炮] Alt+Shift+9Option+Command(⌘)+9舉手/放下手 Alt+YOption+Y將音訊靜音/取消靜音 Alt+ACommand(⌘)+Shift+A表1: Zoom 鍵盤快速鍵參考
-
利用【聊天室】來向講師或學員傳達訊息
Zoom 軟體有個「聊天」功能,但請不要在「所有人」的視窗聊天,因為很多人一起聊天的結果,就是大家都找不到訊息。
這個「聊天室」功能主要用來讓學員與講師之間的溝通,如果你有任何問題,可以在「聊天室」中發問,講師、助教或其他學員都會盡量回答你的問題。
留言時,請務必在一個訊息中把問題打完,不要像 LINE 一樣,想到一句打一句,否則可能會不同人發問的問題之間交錯出現,導致閱讀困難。
回覆留言時,請多利用「回覆」功能,讓一個問題的討論可以聚焦在同一個討論串內,這樣大家閱讀起來會比較清楚。
-
利用【麥克風】使用語音提問
進入會議室之後,麥克風會處於「鎖定」的狀態,如有問題想透過語音發問,請先點擊 Zoom 軟體的「舉手」按鈕,講師會開啟你的麥克風讓你線上發問。
如果講師需要學員進行語音互動時,願意發言的人,也可以先按下「舉手」等候講師呼喚,並準備開啟麥克風,這樣才不會花太多時間等待學員回應。
-
不開放【視訊】使用
原則上我們上課不需要開啟視訊鏡頭,以確保大家的個人隱私。
上課連結
由於我們上課時會採用 Zoom Workplace 桌面應用程式 軟體進行授課,而上課的 Zoom 會議室連結實際上是會透過另外的郵件通知學員,郵件主旨會是:
【上課通知】GitHub Copilot 進階開發實戰 1220
如果你在上課當天都還沒收到通知郵件,請立即寫信與我們聯繫!🔥